
Introduction
The template configuration window is used to introduce inspiration library templates into an existing Hysopt model in a structured and efficient way. It is designed around the energy centre placeholders on the current canvas: the window detects these placeholders, allows you to assign a template to each placeholder, and then replaces them automatically.
The template replacement functionality makes it possible to move from an early-stage model with placeholders to a model that contains an actual energy centre concept, without manually rebuilding the primary side. It also supports rapid optioneering, because different templates can be inserted as alternative variants of the same secondary-side design.
How to use it
Before opening the template configuration window, the active canvas must contain at least one energy centre placeholder. Placeholders indicate where an energy centre template will be injected into the model. Because the template will take up space on the canvas, placeholder positioning matters for which you can following the guidelines in placeholder placement guidelines.
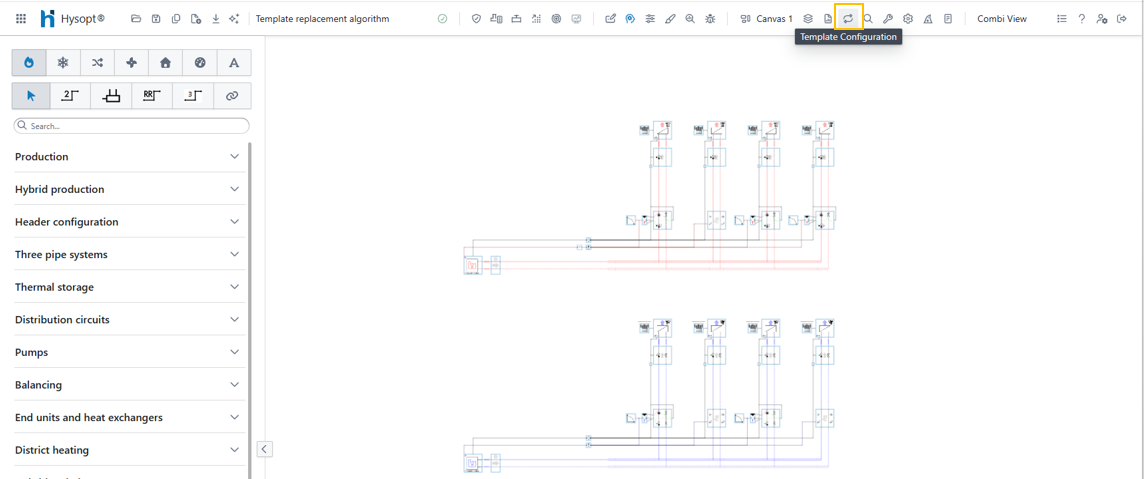
Open the template configuration window using Ctrl+P (“Ctrl+Placeholder”) or by clicking the template configuration button ![]()
Before you proceed, you can already take into account following recommendations:
-
It is advised to provide sufficient free space at the left-hand side of the placeholders for a template to be inserted.
-
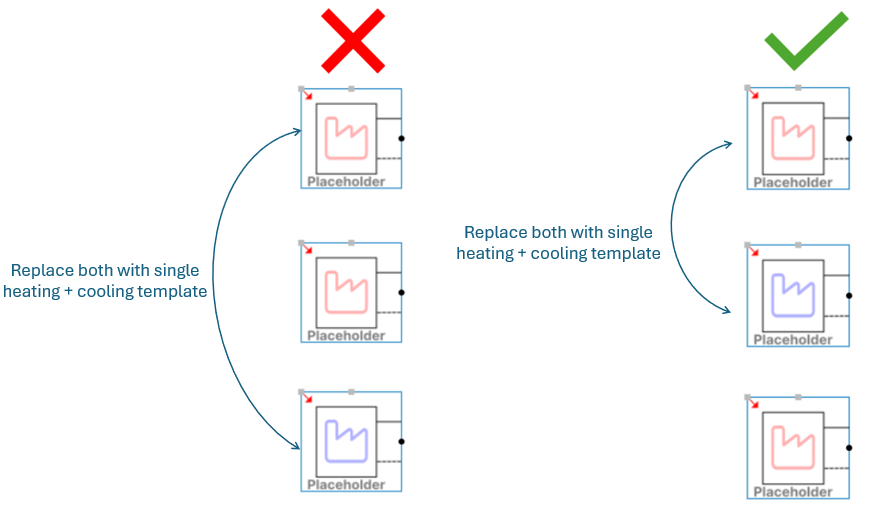
If you intend to replace a heating and cooling placeholder with a single heating + cooling template, it is advised to place the heating placeholder directly above the cooling placeholder and keep the area between them empty.
Template configuration window
After opening the template configuration window, you get to the following screen:
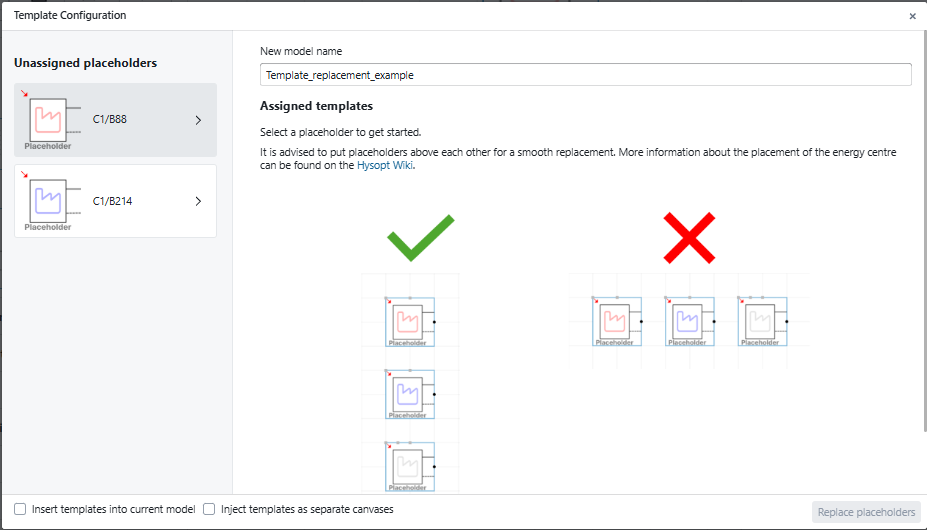
The main area currently displays a guidance text with placeholder placement images and the possibility to enter a New model name. The left panel gives an overview of the unassigned templates on the current canvas. You can customise the name of the placeholders by updating the P&ID Identifier of the corresponding objects on the Hysopt canvas.
To proceed, select a placeholder from the unassigned placeholder list.
Assigning templates to placeholders
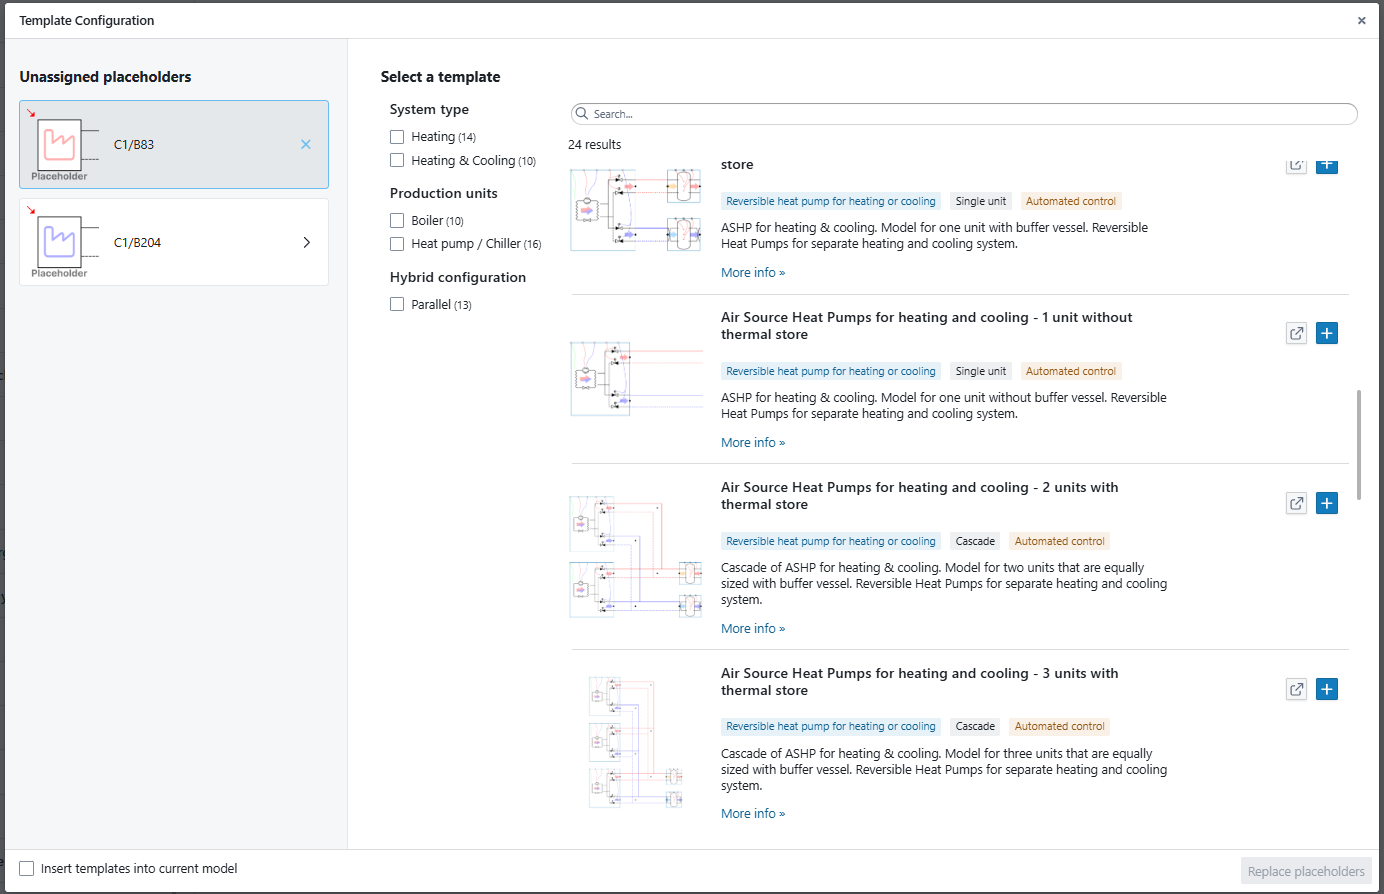
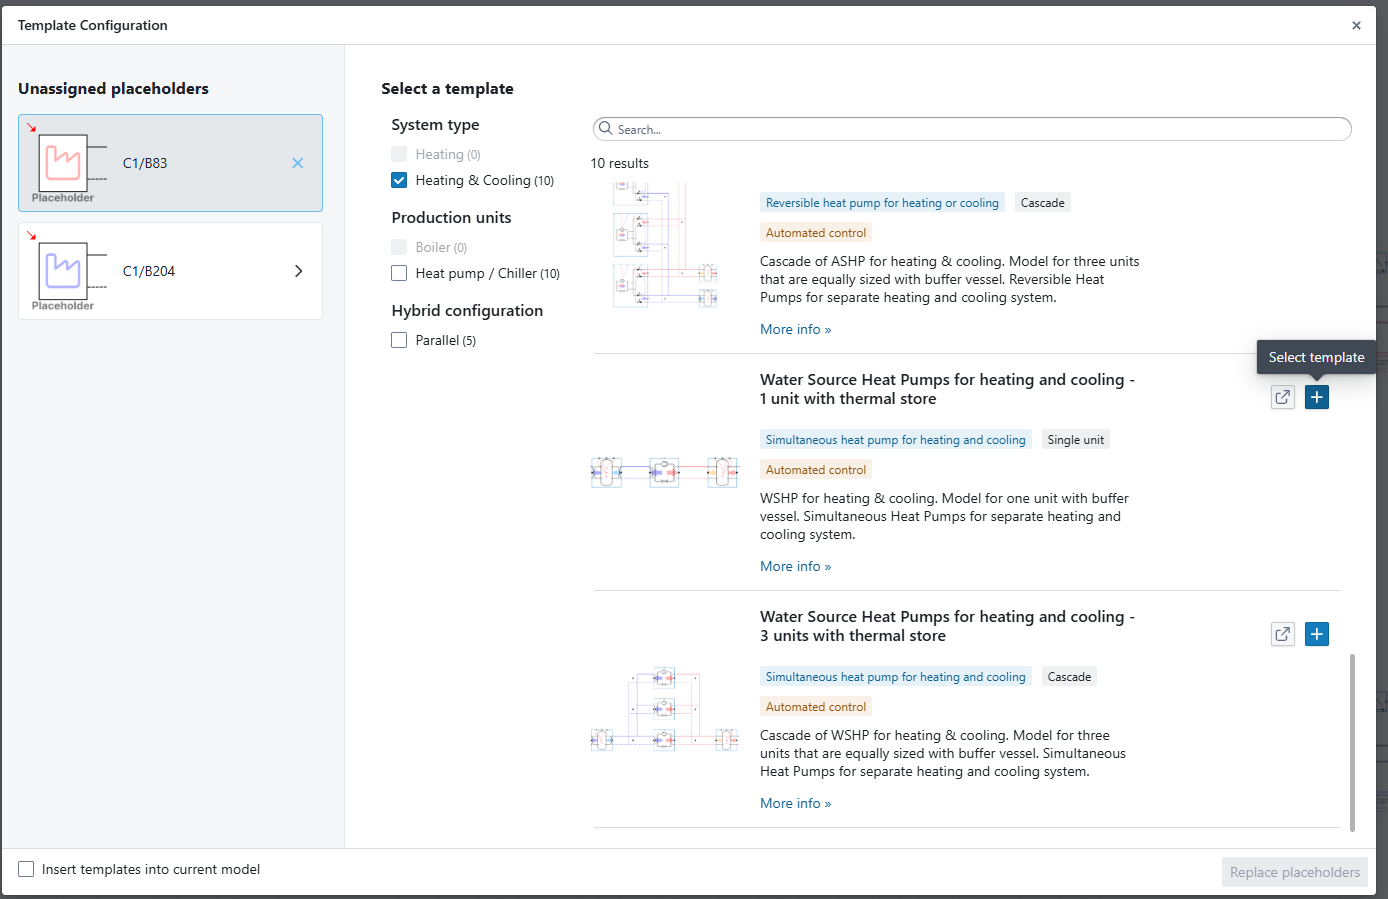
When having selected a placeholder, the main area will transform to a pre-filtered list of the inspiration library. For heating placeholders, only energy centre templates providing heating and heating+cooling will be shown. The same principle applies to cooling placeholders and changeover placeholders.
In this screen, you can select an energy centre template for your particular placeholder using ![]()
![]()
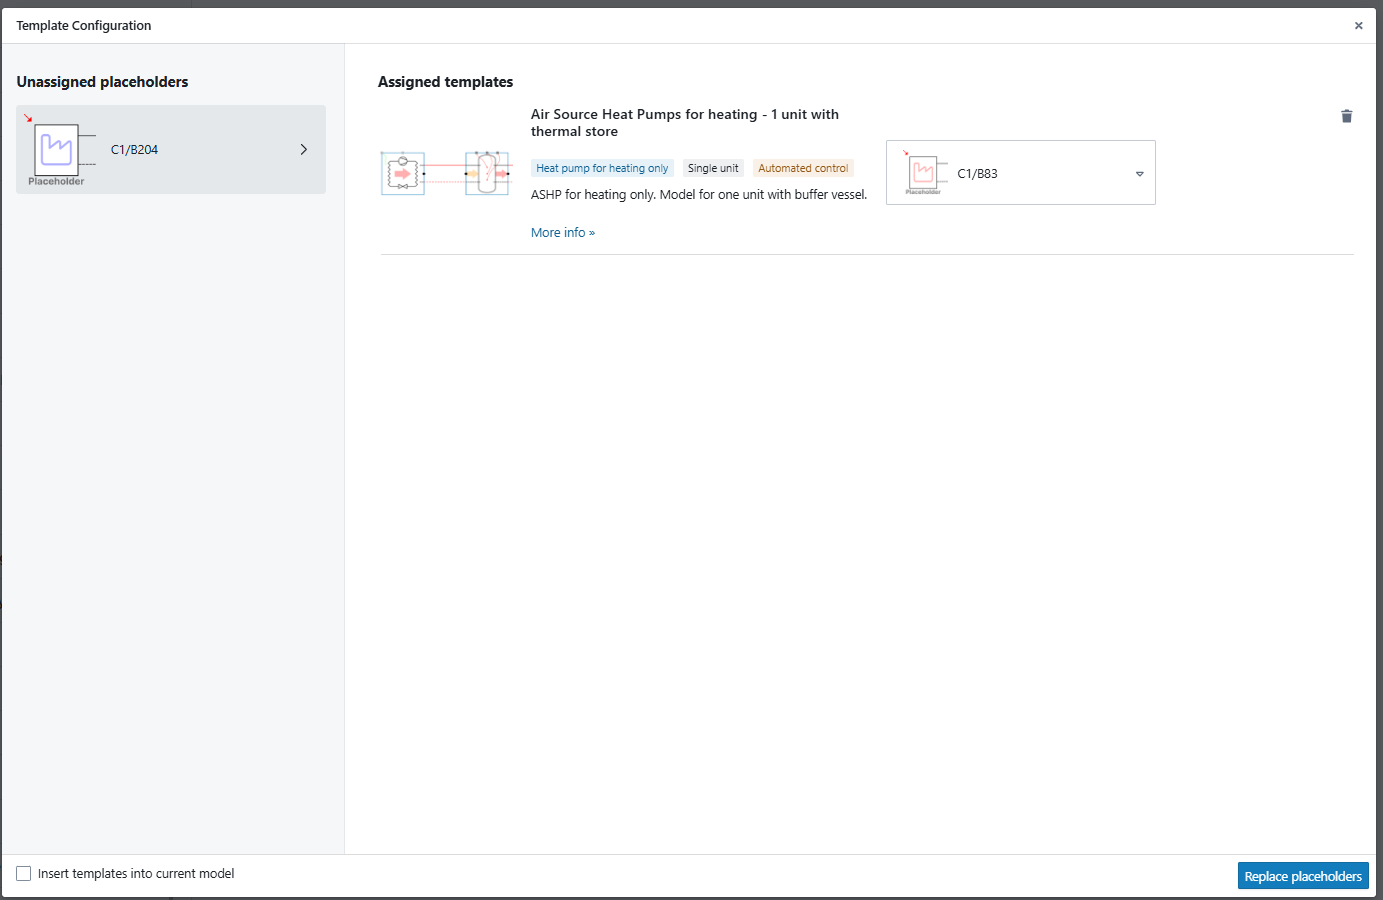
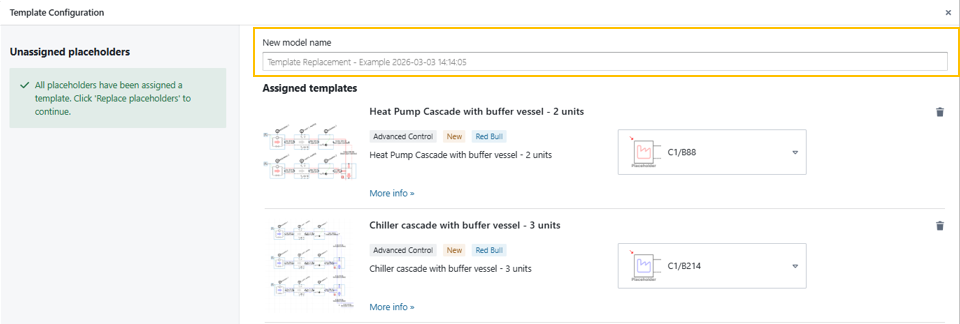
After having selected a template, the main area will now provide an overview of the assigned templates and the assigned placeholders. You can now choose to already insert the single placeholder using the ![]()
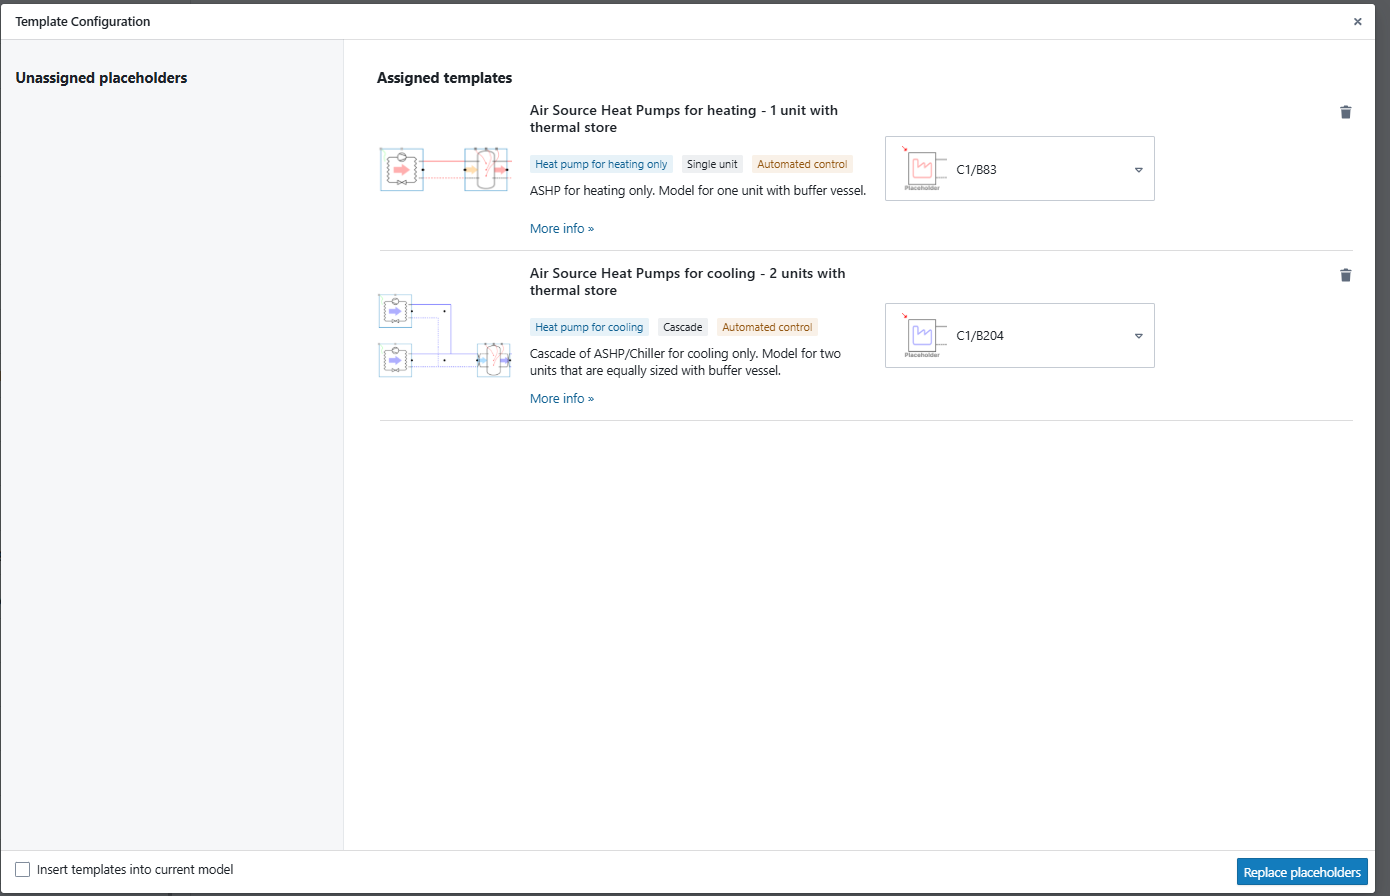
When now pressing the ![]()
You now successfully have inserted a template. A new model has been created during the replacement so that you can easily get back to your original model. Note that before you can start simulating, you still need to parametrise the template itself using the input view.
Special situation: Heating + cooling templates
A special situation occurs when you want to couple a template that provides heating + cooling. These templates need to be coupled to a secondary side for heating and a secondary side for cooling. Energy centre templates that fall in this category typically consist of water/water heat pumps, ATES/BTES systems, polyvalent heat pumps and reversible heat pumps or any combinations of these.
In order to couple a heating+cooling template, you start by selecting a single unassigned placeholder from the left panel. Next you select the template of your choice. In this case, we will select a “Heating & Cooling” template as shown in the figure below:
Next, the assigned templates/placeholders overview will display the chosen template with two placeholder fields for placeholder assignment. One placeholder field will already be assigned as depicted in the figure below:
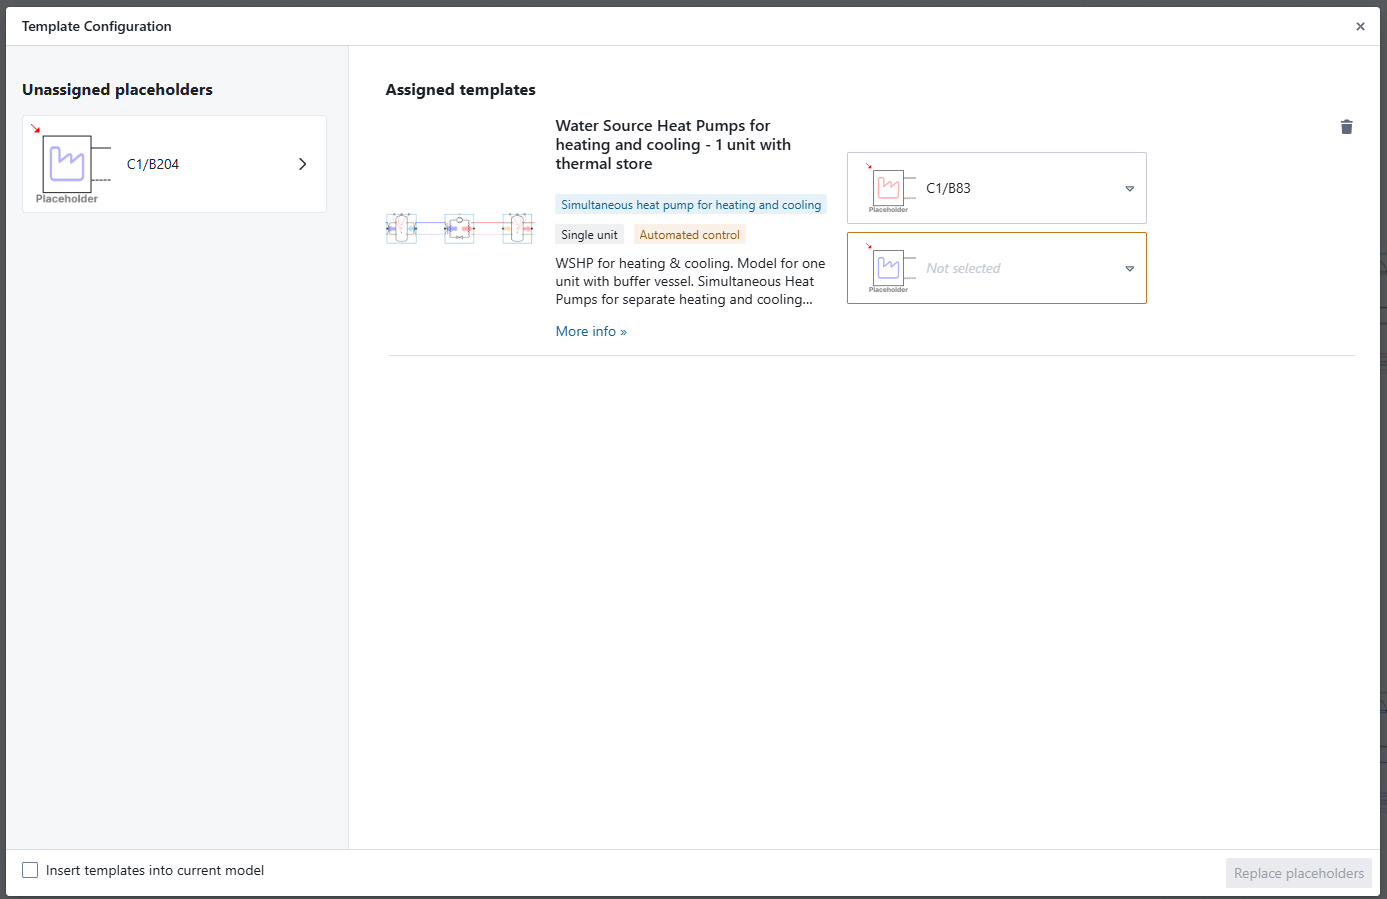
In order to complete the template assignment, you need to specify the second placeholder field using the dropdown. In this dropdown, you can select whichever placeholder you want to assign as second placeholder to this template.
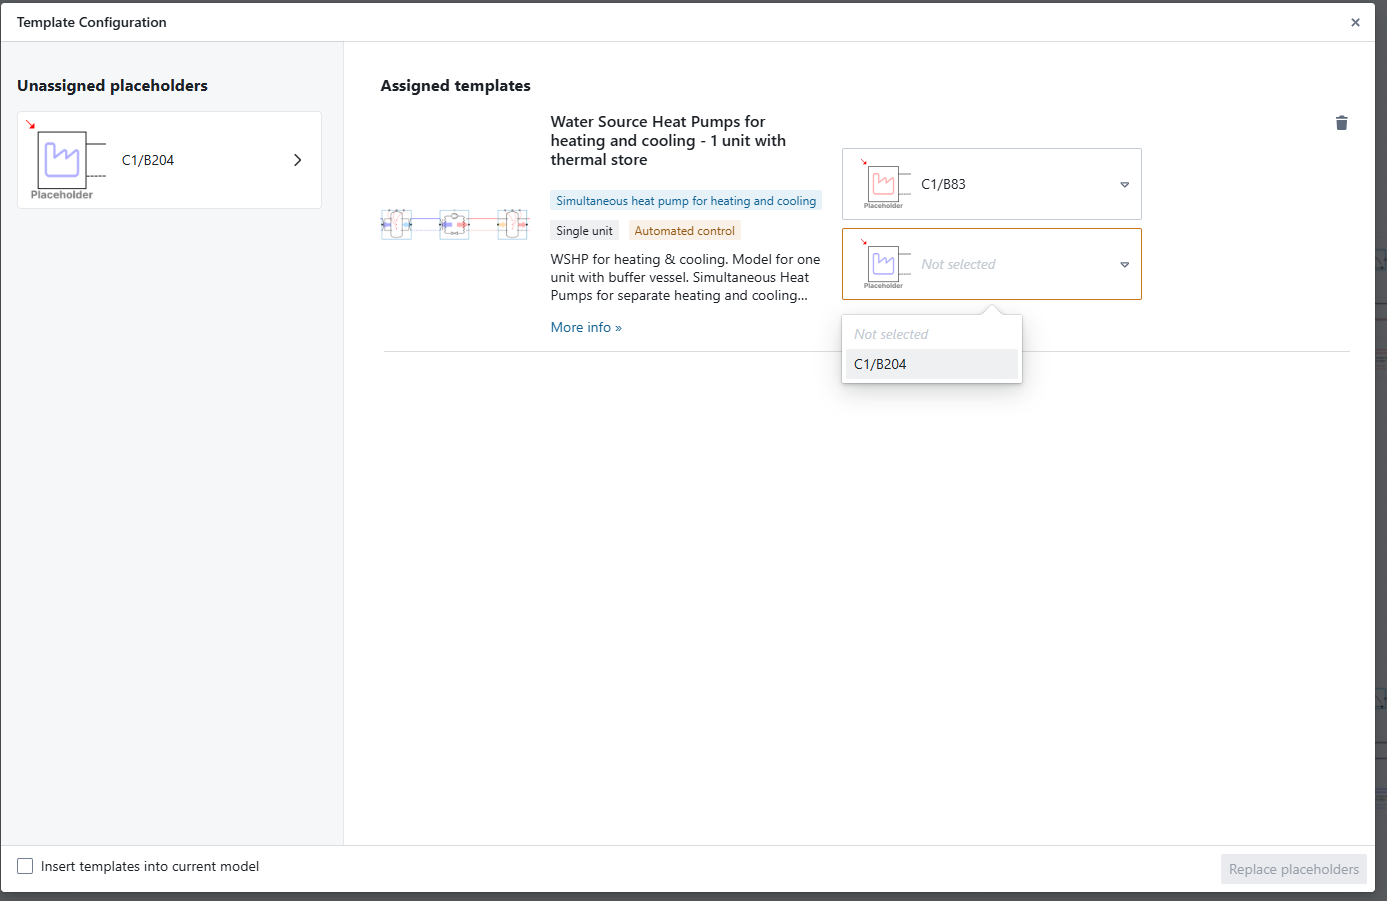
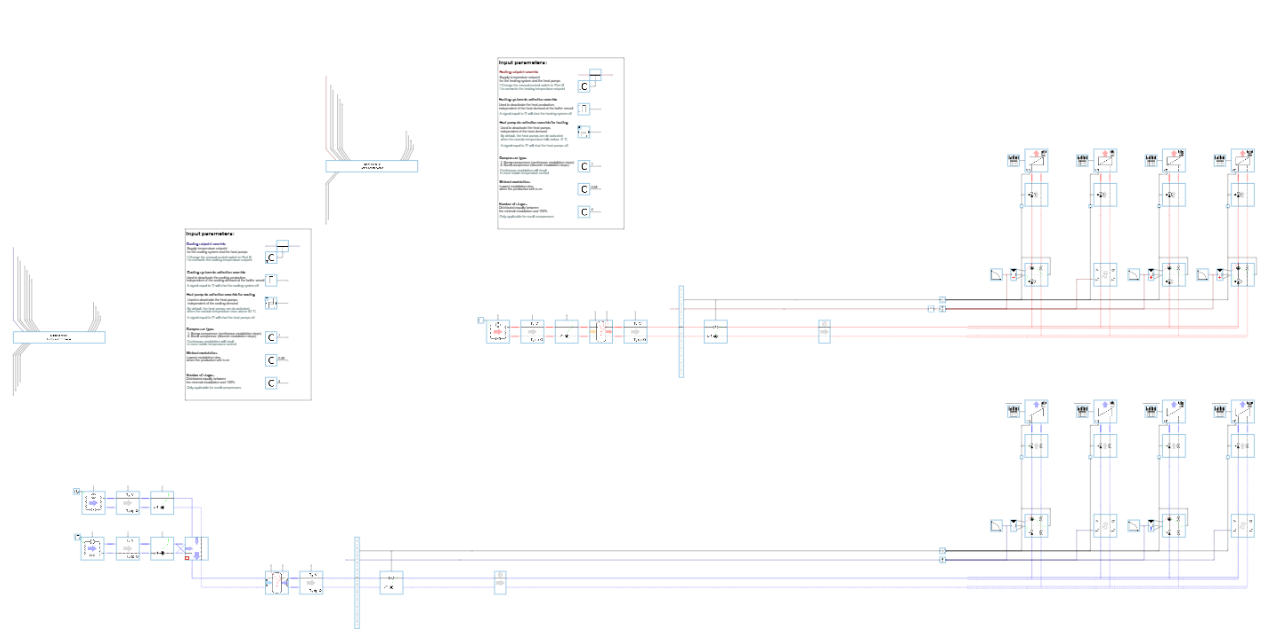
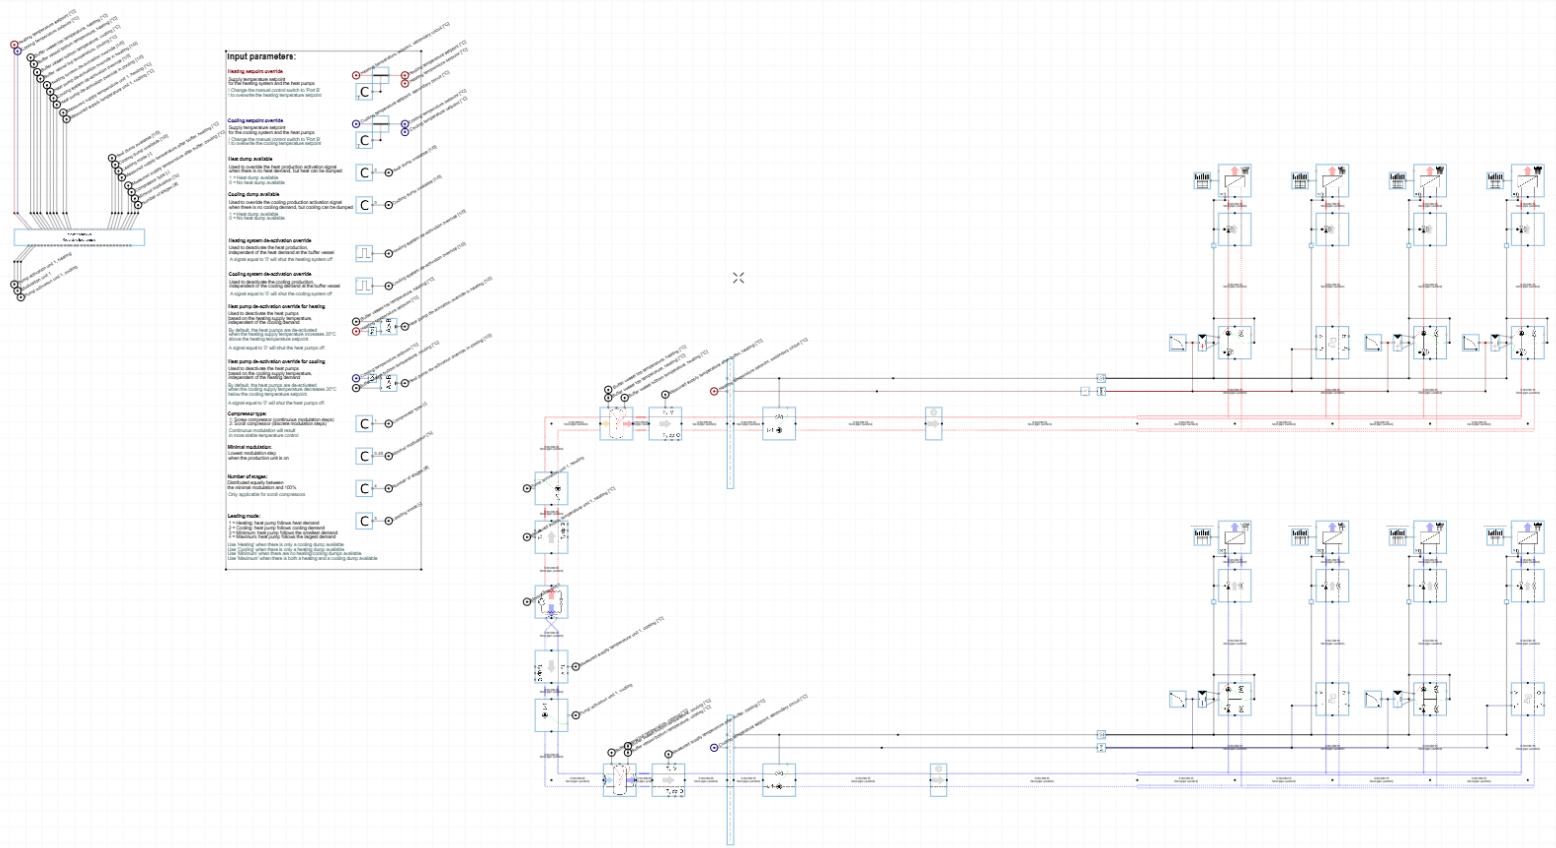
When you have selected a second placeholder, the template is fully configured. The heating placeholder and the cooling placeholder can now be replaced with one single template. The result is shown below. Before you can effectively start simulating, you still need to fill in the remaining inputs of the template for which you can use the input view.
Miscellaneous
New model name
In general, a template replacement action using ![]()
You can customise the name of this newly created model using the New Model Name input field at the top of the template configuration screen. Hysopt will provide a default New model name so adjusting this input field is optional.
Insert in current model
You also have the possibility insert the template into your actual model. You can activate this using the “Insert templates into current model” toggle at the bottom of the template configuration screen. There will not be created a new model when replacing the placeholders.
When inserting templates in the current model, the original model will be lost. It is generally discouraged to active this option.
Pump conflict
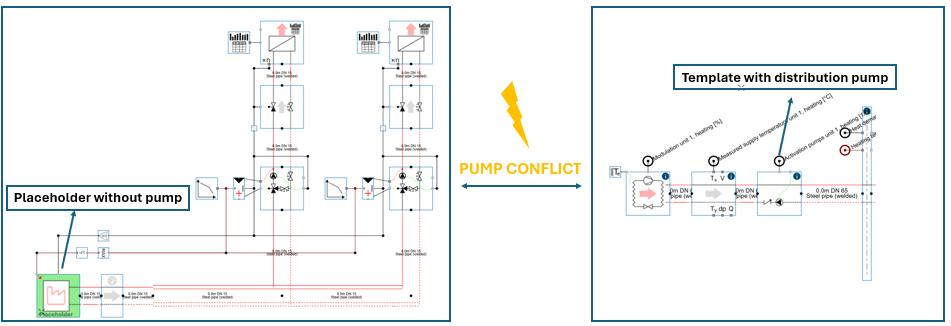
For some templates, you will see a “PUMP CONFLICT” warning while selecting an energy centre template.
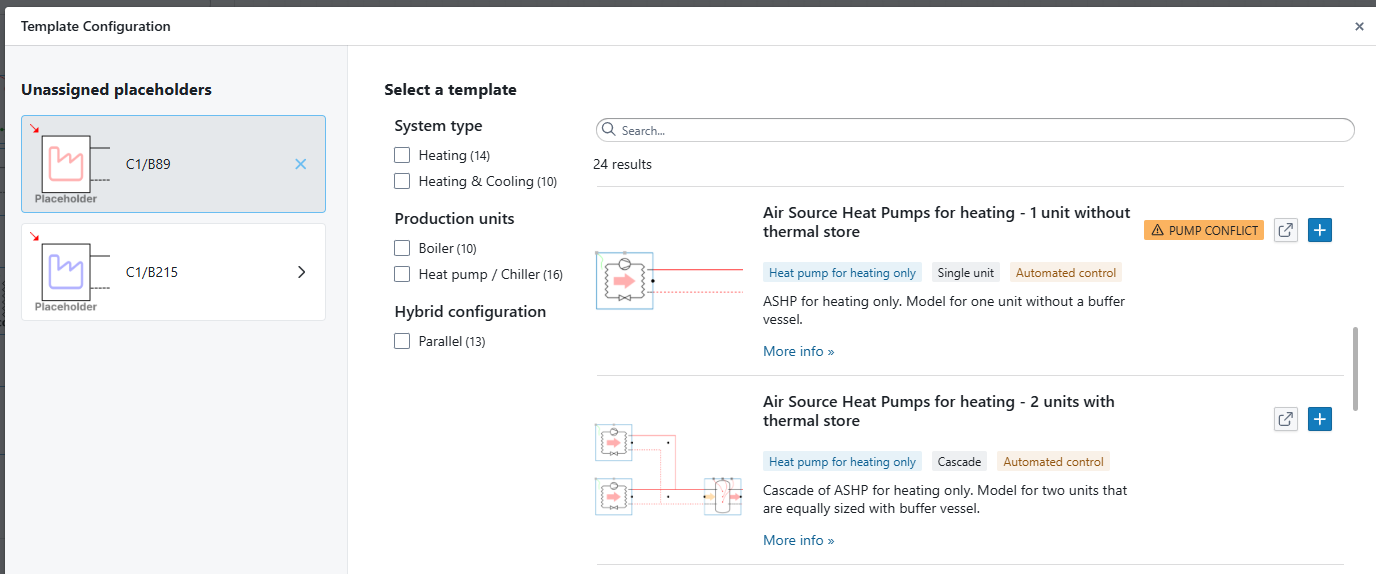
This situation occurs when you have an energy centre placeholder that does not contain an internal pump. This means that the target energy centre template also should not contain the system’s distribution pump.
Some templates are built with the system’s distribution pump as part of the template. When replacing a placeholder without pump with an energy centre template with disitrbution pump, we introduce a pump conflict in the resulting model. When this situation occurs, you should manually update the system accordingly to avoid propagation of the pump conflict throughout the rest of the project.
You can resolve the pump conflict scenario after replacement by:
-
Maintaining the pump in the energy centre and replacing active elements in the secondary side to passive implementations
-
Delete the pump in the energy centre and maintain active elements in the secondary side.
After template insertion
After inserting a template, Hysopt typically creates a new model that contains the inserted energy centre concept. At the location of the placeholder, an energy centre front is added. This front provides a clear visual separation between the secondary side and the energy centre and ensures that relevant control information is correctly propagated towards the energy centre.
When the setpoint temperature at the right-hand side of the front is not connected, the design supply temperature will be propagated as setpoint temperature.
The inserted template will appear in the model with its control wiring connected automatically. However, the model is usually not ready for simulation immediately, because energy centre templates still contain input parameters that need to be configured for the project.
A practical next step is to use the Input view:
-
It highlights the remaining required inputs.
-
It provides a quick path to complete the minimal set of parameters required for simulation.
If some of the remaining inputs are design parameters that you want to derive from the model rather than prescribe up front, a useful approach is:
-
Fill in all other required inputs first.
-
Then run a sensitivity analysis on the design parameters.
Once the remaining required inputs are completed, the model containing the inserted template is ready for simulation.
Making variants (Energy Centre optioneering)
Template replacement is particularly useful for exploring multiple energy centre options. Because the replacement algorithm typically creates a copy of your model when inserting a template, the original model remains available.
This enables a simple variant workflow:
-
Start from the same secondary-side model with placeholders.
-
Insert one template and complete the required inputs.
-
Simulate and save the variant.
-
Return to the original model and repeat with another template.
Combined with sensitivity analysis, this supports fast exploration of multiple energy centre concepts. Once the different variants are simulated, they can be compared using the Pareto analysis to support selection during the optioneering phase.
Placeholder placement guidelines
Energy centre templates are injected at the placeholder locations, so there must be enough room on the canvas to place them. Hysopt uses an auto-placement algorithm to avoid overlap wherever possible. If overlap cannot be avoided, the algorithm still aims to keep the result recoverable so that you can correct the layout manually.
To make insertion as smooth as possible, the following guidelines are recommended.
General placement
-
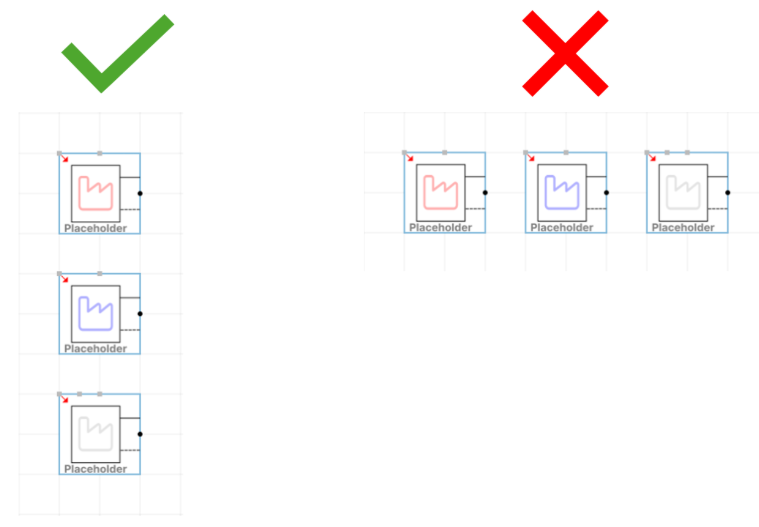
Prefer placeholders placed above each other; the placement algorithm is optimised for this configuration.
-
Avoid placing placeholders next to each other. Inserted templates are typically placed on the left-hand side of the placeholder location, which increases overlap risk for side-by-side placeholders.
-
Side-by-side placeholders can work if you leave sufficient horizontal space for the template to fit without intersecting other components.
Heating + cooling combined templates
-
If a single template needs to be connected to both the heating and cooling secondary side, place the heating placeholder directly above the cooling placeholder.
-
Keep the area between the two placeholders free of components. Components placed in between can become encapsulated in the space where the template must be inserted, increasing overlap risk.
Drawing direction
-
Draw systems from left to right when possible; the placement algorithm is tuned for this layout.
-
If a system is drawn right to left, create a turn at the end of the header and place the placeholder above the header to reserve insertion space.
If overlap still occurs
If a template is inserted and some overlap remains, the situation is usually easy to recover.
Option 1: rerun the replacement from the original model.
By default, template replacement creates a new model, so the original version (without the inserted template) is still available in the same folder or via Recent models. You can open that original model, adjust the placeholder positions or their order using the placement guidelines above, and then run template replacement again. In many cases this yields a clean result without overlap.
Option 2: manually move the inserted template.
Even when overlap occurs, the inserted template can be selected as a whole because it has an invisible rectangle box that is being guarded during the placement algorithm. Use the selection box tool (click and drag) to select the entire template, then move it to a more suitable location on the canvas to avoid overlap.
This process of manually extracting a template when overlap occurs is displayed below where the selection box of the cooling template is depicted:
Option 3: insert the templates on separate canvas
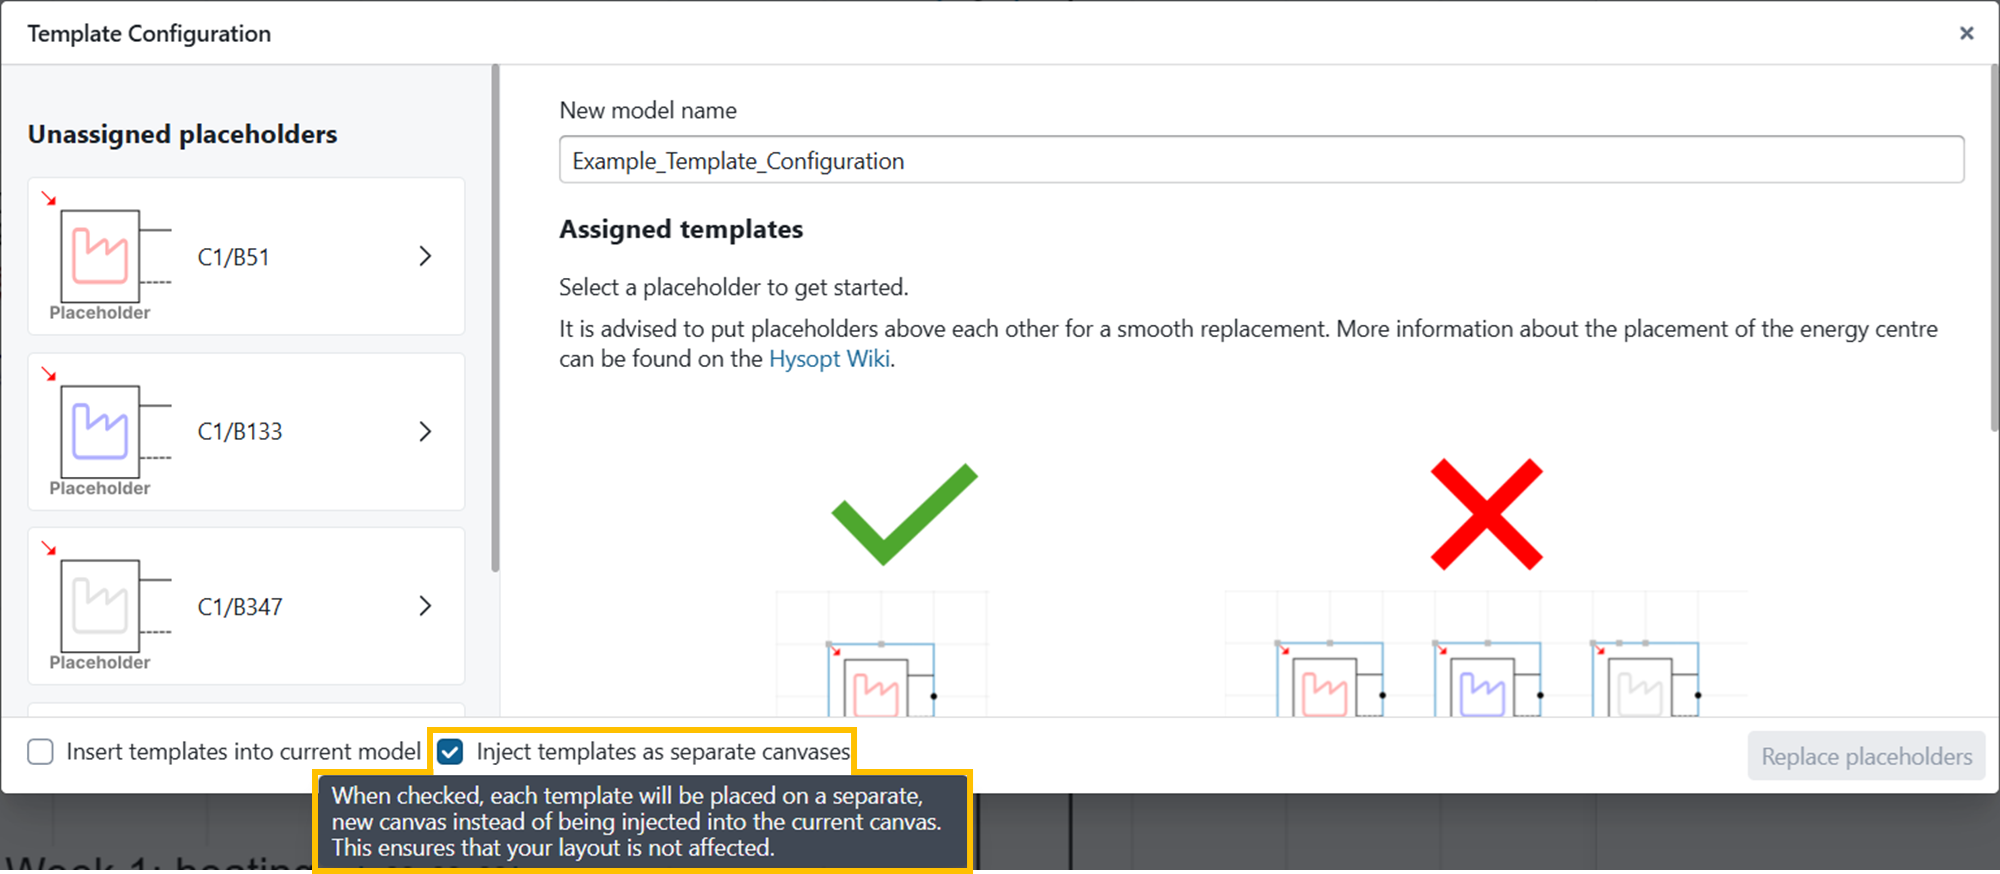
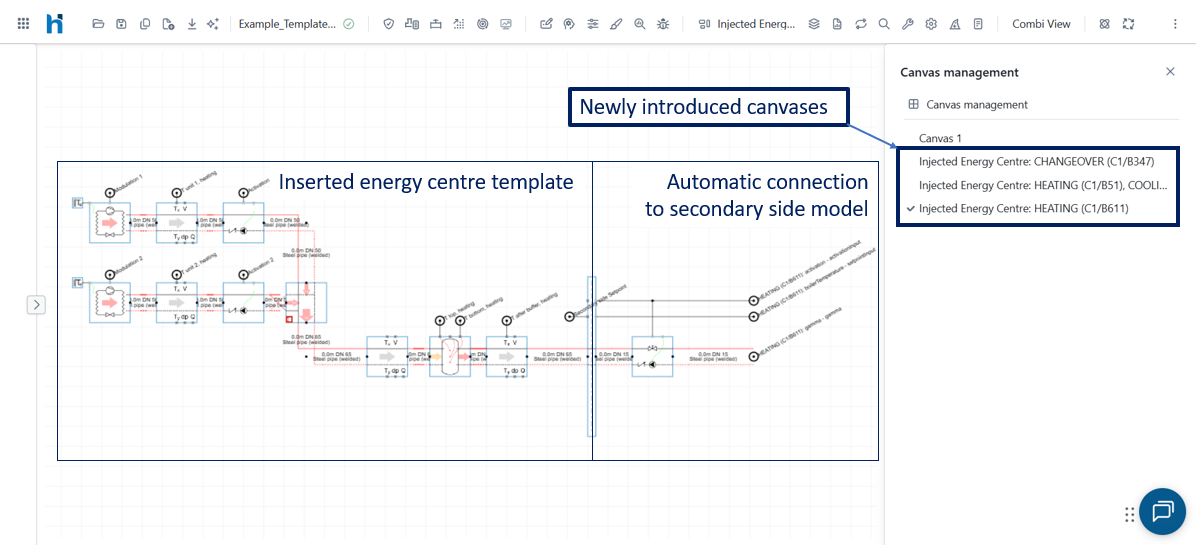
If overlaps keep occurring, you can choose to automatically place each energy centre template on a new Hysopt canvas. This prevents overlaps in all scenarios, so you do not need to reserve free space in your placeholder model.
You can enable this functionality using the “Inject templates at separate canvas” toggle in the bottom ribbon of the template configuration window.
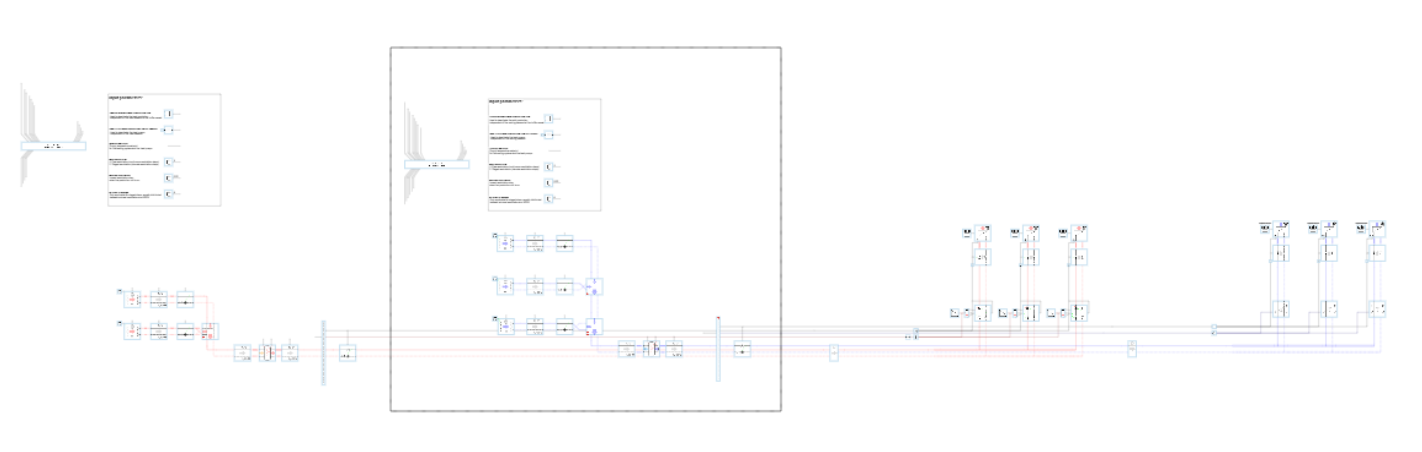
An example of using “Insert templates as separate canvases” is shown below:
Recommended workflow
The template configuration window is part of a bigger workflow process within Hysopt to make executing Hysopt project from A to Z as smoothly as possible.
The proposed workflow starts with a model that contains energy centre placeholders, for example generated via the Building Simulation Quickstart Wizard. The secondary side is parametrised using the Input view, followed by an initial simulation to understand secondary-side behaviour. The simulation dashboard can be used to analyse loads, temperature levels, and other relevant outputs.
The results of this secondary-side analysis are then used as input for selecting an energy centre concept. Using the template configuration window, one or more templates can be inserted at the placeholder location to create energy centre variants.
A practical sequence is:
-
Complete the secondary side first and validate its behaviour.
-
Insert a template using the template configuration window.
-
Use the Input view to complete the template inputs for your situation.
-
Run simulation, sensitivity analysis and Pareto analysis to compare alternatives.
Conclusion
The template configuration window provides a structured way to replace energy centre placeholders with inspiration library templates, with automatic placement and control-wire connection. It supports a smooth transition from early-stage secondary-side modelling to energy centre concept selection, and it enables fast creation of model variants for optioneering. With careful placeholder placement and the use of Input view, sensitivity analysis, and Pareto analysis, the feature becomes a practical backbone for exploring and comparing energy centre options in Hysopt.